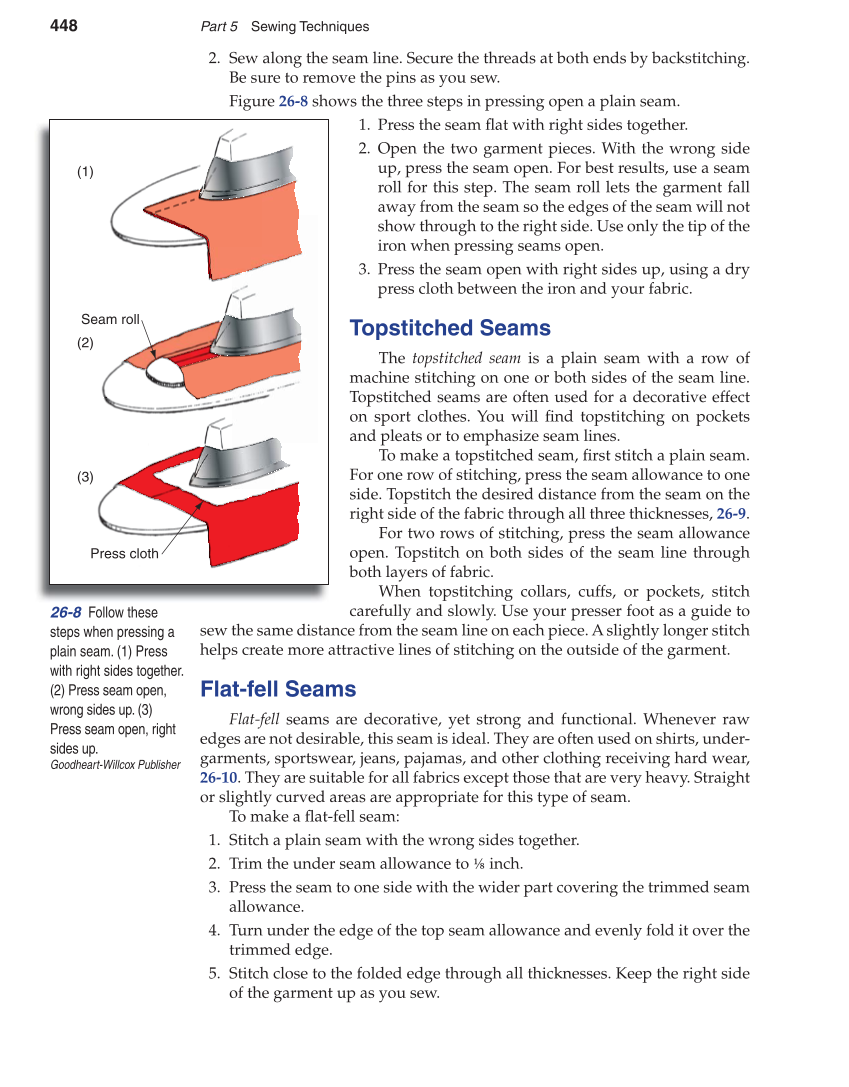
448 Part 5 Sewing Techniques 2. Sew along the seam line. Secure the threads at both ends by backstitching. Be sure to remove the pins as you sew. Figure 26-8 shows the three steps in pressing open a plain seam. 1. Press the seam fl at with right sides together. 2. Open the two garment pieces. With the wrong side up, press the seam open. For best results, use a seam roll for this step. The seam roll lets the garment fall away from the seam so the edges of the seam will not show through to the right side. Use only the tip of the iron when pressing seams open. 3. Press the seam open with right sides up, using a dry press cloth between the iron and your fabric. Topstitched Seams The topstitched seam is a plain seam with a row of machine stitching on one or both sides of the seam line. Topstitched seams are often used for a decorative effect on sport clothes. You will fi nd topstitching on pockets and pleats or to emphasize seam lines. To make a topstitched seam, fi rst stitch a plain seam. For one row of stitching, press the seam allowance to one side. Topstitch the desired distance from the seam on the right side of the fabric through all three thicknesses, 26-9. For two rows of stitching, press the seam allowance open. Topstitch on both sides of the seam line through both layers of fabric. When topstitching collars, cuffs, or pockets, stitch carefully and slowly. Use your presser foot as a guide to sew the same distance from the seam line on each piece. A slightly longer stitch helps create more attractive lines of stitching on the outside of the garment. Flat-fell Seams Flat-fell seams are decorative, yet strong and functional. Whenever raw edges are not desirable, this seam is ideal. They are often used on shirts, under- garments, sportswear, jeans, pajamas, and other clothing receiving hard wear, 26-10. They are suitable for all fabrics except those that are very heavy. Straight or slightly curved areas are appropriate for this type of seam. To make a fl at-fell seam: 1. Stitch a plain seam with the wrong sides together. 2. Trim the under seam allowance to ⅛ inch. 3. Press the seam to one side with the wider part covering the trimmed seam allowance. 4. Turn under the edge of the top seam allowance and evenly fold it over the trimmed edge. 5. Stitch close to the folded edge through all thicknesses. Keep the right side of the garment up as you sew. 26-8 Follow these steps when pressing a plain seam. (1) Press with right sides together. (2) Press seam open, wrong sides up. (3) Press seam open, right sides up. Goodheart-Willcox Publisher Press cloth Seam roll (1) (2) (3)
